Instructions
Step 1: Prepare the apple filling
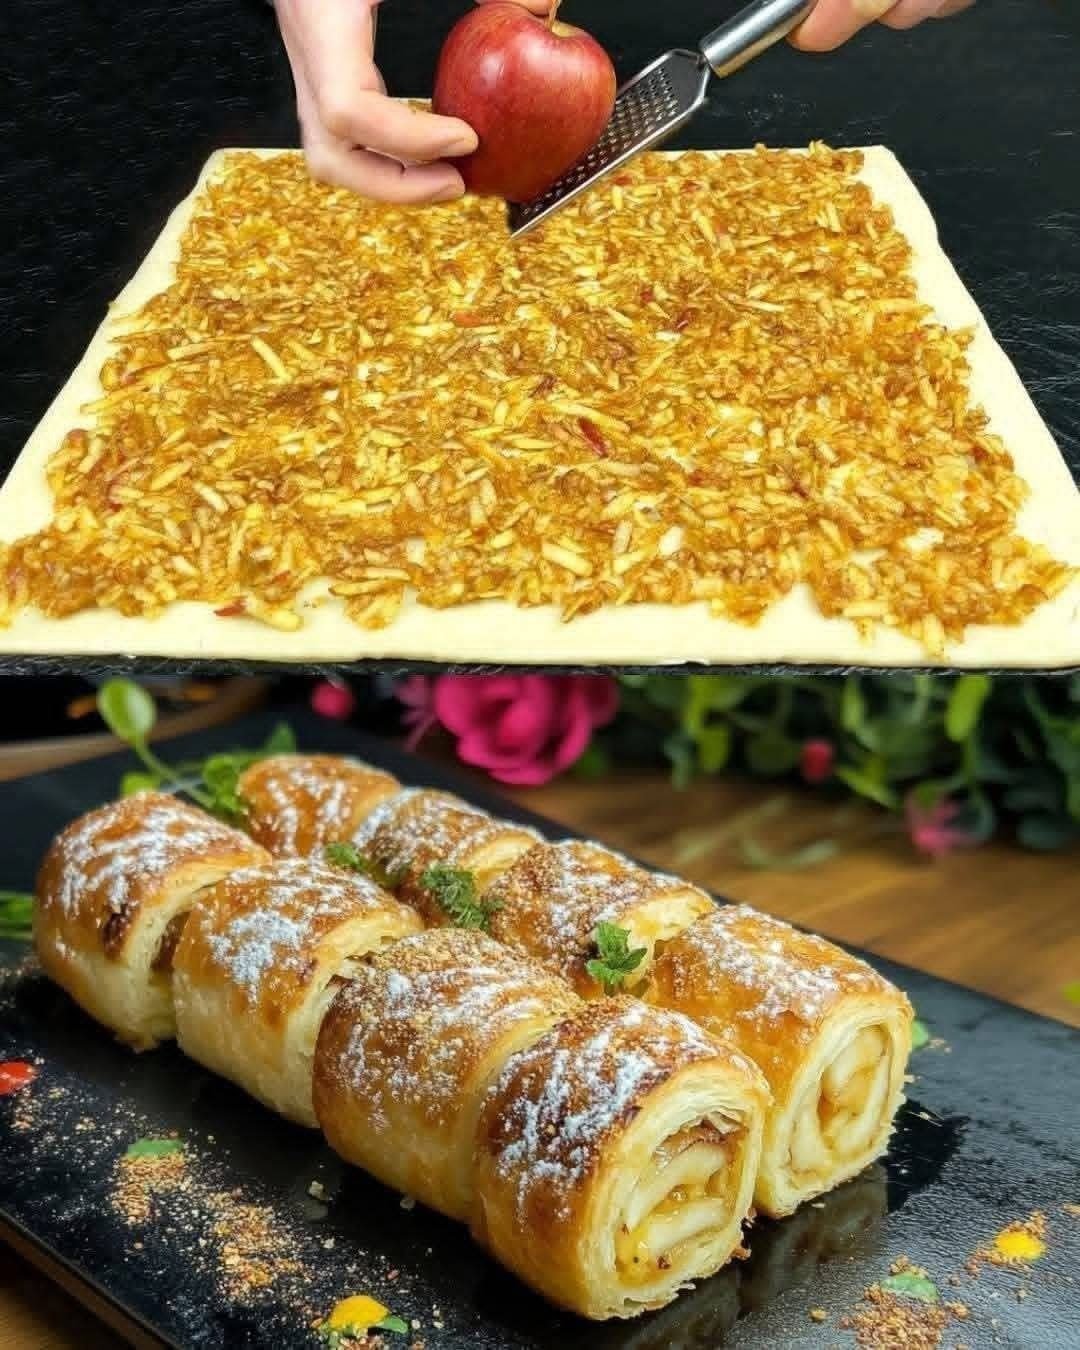
Start by preparing the apples. You may peel them if you prefer a smoother texture, or leave the peel on for a more rustic result and added color. Using a coarse grater, grate all the apples into a large mixing bowl.
Once grated, immediately add the lemon juice and mix it through. This prevents the apples from browning and enhances the overall flavor.
Add the sugar, cinnamon, vanilla extract, and melted butter. Mix everything thoroughly until the apples are evenly coated and the mixture becomes fragrant.
At this stage, the apples will release a fair amount of liquid. To avoid soggy pastry later, take a handful of the mixture and gently squeeze out excess juice. You do not need to remove all the moisture, just enough so the filling is moist but not watery.
If the mixture still seems too wet, incorporate ground walnuts or breadcrumbs. These will help absorb excess liquid during baking while adding a subtle texture.
If using raisins, fold them in now.
Set the filling aside while you prepare the pastry.
Step 2: Roll and shape the pastry
Lightly flour your work surface if necessary and place the puff pastry sheet flat on the counter. If the pastry is too firm, allow it to sit at room temperature for a few minutes until it becomes pliable but still cool.
Spread the apple mixture evenly across the entire surface of the pastry. Make sure the filling reaches close to the edges, but leave a small border to prevent overflow when rolling.
Starting from one long side, carefully roll the pastry into a tight log. Try to keep the roll even and compact so the slices hold their shape during baking.
Once rolled, use a sharp knife to slice the log into equal pieces, approximately 6 to 8 rolls depending on your preferred size. Wipe the knife between cuts if needed to keep the slices neat.
Step 3: Bake
Preheat your oven to 190°C (375°F).
Line a baking tray with parchment paper and place the pastry rolls on it, leaving a little space between each one to allow for expansion.
Brush the tops of the rolls with the beaten egg. This step gives them a glossy, golden finish once baked.
Place the tray in the preheated oven and bake for 20 to 25 minutes, or until the pastry is puffed, crisp, and deeply golden brown.
Keep an eye on them toward the end of baking to avoid over-browning.
Step 4: Finish and serve
Remove the rolls from the oven and allow them to cool slightly on the tray or a wire rack. This helps the filling set and makes them easier to handle.
Before serving, dust lightly with powdered sugar for a classic finish.
These pastry rolls are best enjoyed warm, when the filling is soft and aromatic and the pastry is crisp.
Tips for Best Results
Choose firm apple varieties such as Gala, Honeycrisp, or Fuji. These hold their texture well during baking and provide a balanced sweetness.
Do not skip squeezing out excess liquid from the apples. This is essential for achieving crisp pastry rather than a soggy base.
Adding a small amount of butter to the filling enhances richness and keeps the interior tender.
If you prefer a more caramelized flavor, you can use brown sugar instead of white sugar.
Serve the rolls warm with a scoop of vanilla ice cream or a drizzle of caramel sauce for a more indulgent dessert.
Conclusion
In the end, Apple Puff Pastry Rolls are more than just a dessert—they’re a celebration of warmth, simplicity, and the magic of baking. Each bite offers a satisfying contrast between the crisp, buttery layers of pastry and the tender, cinnamon-spiced apple filling nestled inside. It’s a dessert that manages to feel both indulgent and comforting, making it suitable for everything from casual snacks to special gatherings.
One of the most appealing aspects of this recipe is how customizable it is. You can adjust the sweetness, experiment with different apple varieties, or enhance the filling with nuts and raisins for added texture. Served warm, perhaps with a dusting of powdered sugar or alongside a scoop of vanilla ice cream, these rolls transform into a truly irresistible treat that’s hard to stop at just one.
Whether you’re baking for your family, entertaining guests, or simply treating yourself, this recipe promises reliable and delicious results every time. Once you experience the rich aroma and satisfying taste of these freshly baked rolls, they’re sure to earn a permanent place in your dessert rotation—a comforting classic you’ll return to again and again.
